WEEK 18
We must submit our hardcover project report to UniKL BMI library with get confirmation for our advisor.
Tuesday, 21 May 2013
FYP REPORT DRAFT
WEEK 15 & WEEK 16
That week we submitted our draft report for our project to our advisor to check and mark the report.
That week we submitted our draft report for our project to our advisor to check and mark the report.
PRESENTATION PROJECT
WEEK 14
This week we have presentation about our project. Our accessors for that day are Madam Nor Amalia Bt Sapiee and Sir Hisym Bin Desa. Alhamdulillah we can answer all the questions about our project.
This week we have presentation about our project. Our accessors for that day are Madam Nor Amalia Bt Sapiee and Sir Hisym Bin Desa. Alhamdulillah we can answer all the questions about our project.
CHAPTER 5
WEEK 13
Future Work
For the future work of this project can be improved. By resume this project was done, RC helicopter can be controlled automatically by entering the desired program into memory. So, to make RC helicopter work we no longer have control RC helicopter either on the controller or on the computer.
To get a consistent stability, the project will need to convert RC helicopter 4 channel to use a quad copter. By using the quad copter is more stable because it has four blades that can stabilize the condition of the RC helicopter.

CHAPTER 3
WEEK 11
Software Development
1. Proteus 7 Professional
Proteus 7 Professional was use to designed Schematic drawing and Printed circuit board (PCB) drawing, which is this software can convert schematic file into PCB automatically. This is the first process which is they need to design the entire component needed before etching it to the board. It also can simulate the circuit whether it function or not. It will be interconnect to C language by burn the program into PIC Microcontroller.
2. MPLAB IDE v8.30
MPLAB Integrated Development Environment (IDE) is an integrated toolset for the development of embedded applications employing Microchip's PIC® and dsPIC® microcontrollers. MPLAB IDE runs as a 32-bit application on MS Windows®, is easy to use and includes a host of free software components for fast application development and super-charged debugging. MPLAB IDE also serves as a single, unified graphical user interface for additional Microchip and third party software and hardware development tools. Moving between tools is a snap, and upgrading from the free software simulator to hardware debug and programming tools is done in a flash because MPLAB IDE has the same user interface for all tools. Connect PIC Start Plus programmer using rs232 cable with the personal computer (PC). Position the PIC16F877A chip onto the PIC Start Plus programmer.
3.C Programming
C programming is one of thousands of computer programming languages that allow users to create instructions for a computer to follow. While C has a slightly more cryptic style than some other programming languages, it's fairly easy to learn and allows you to read and write code for many different platforms. Because it's so efficient and gives the user a lot of control, C is very popular with programmers.
4. Assembly Languange
An assembly language is a low-level programming for computers, microprocessors, microcontrollers, and other programmable devices. It implements a symbolic representation of the machine and other constants needed to program a given CPU architecture. This representation is usually defined by the hardware manufacturer, and is based on mnemonics that symbolize processing steps (instructions), processor registers, memory locations, and other language features. An assembly language is thus specific to certain physical (or virtual) computer architecture. This is in contrast to most high-level programming languages, which ideally are portable.
5. PIC Kit 2
PICkit 2 has been used to download program into PIC with import .hex file which generate by MPLAB IDE. Steps to Use PICkit 2:
6. Visual Basic 6.0
Visual Basic is a hird generation event driven programming language and integrated development environment (IDE) from Microsoft for its COM programming model first released in 1991. Visual Basic is designed to be relatively easy to learn and use. Visual Basic was derived from BASIC and enables the rapid application development (RAD) of graphical user interface (GUI) applications, access to databases using Data Access Objects, Remote Data Objects, or ArtiveX Data Objects, and creation of ActiveX controls and objects. The scripting language VBScript is a subset of Visual Basic.
Software Development
1. Proteus 7 Professional
Proteus 7 Professional was use to designed Schematic drawing and Printed circuit board (PCB) drawing, which is this software can convert schematic file into PCB automatically. This is the first process which is they need to design the entire component needed before etching it to the board. It also can simulate the circuit whether it function or not. It will be interconnect to C language by burn the program into PIC Microcontroller.
2. MPLAB IDE v8.30
MPLAB Integrated Development Environment (IDE) is an integrated toolset for the development of embedded applications employing Microchip's PIC® and dsPIC® microcontrollers. MPLAB IDE runs as a 32-bit application on MS Windows®, is easy to use and includes a host of free software components for fast application development and super-charged debugging. MPLAB IDE also serves as a single, unified graphical user interface for additional Microchip and third party software and hardware development tools. Moving between tools is a snap, and upgrading from the free software simulator to hardware debug and programming tools is done in a flash because MPLAB IDE has the same user interface for all tools. Connect PIC Start Plus programmer using rs232 cable with the personal computer (PC). Position the PIC16F877A chip onto the PIC Start Plus programmer.
3.C Programming
C programming is one of thousands of computer programming languages that allow users to create instructions for a computer to follow. While C has a slightly more cryptic style than some other programming languages, it's fairly easy to learn and allows you to read and write code for many different platforms. Because it's so efficient and gives the user a lot of control, C is very popular with programmers.
4. Assembly Languange
An assembly language is a low-level programming for computers, microprocessors, microcontrollers, and other programmable devices. It implements a symbolic representation of the machine and other constants needed to program a given CPU architecture. This representation is usually defined by the hardware manufacturer, and is based on mnemonics that symbolize processing steps (instructions), processor registers, memory locations, and other language features. An assembly language is thus specific to certain physical (or virtual) computer architecture. This is in contrast to most high-level programming languages, which ideally are portable.
5. PIC Kit 2
PICkit 2 has been used to download program into PIC with import .hex file which generate by MPLAB IDE. Steps to Use PICkit 2:
1.
Connect PIC programmer to computer via serial port / USB port.
2.
Insert PIC into the programmer socket.
3. Open
the .hex file which you want to export into PIC.
4.
Click for „Read‟-> Read Program from the
export file or from the PIC.
5.
Click for „Write‟ -> Write „abc.hex‟ to the
PIC.
6.
Click for „Verify‟ -> Verify the programming
in the PIC.
7. Click for „Erase‟ ->
Erase the existence programming in the PIC.
6. Visual Basic 6.0
Visual Basic is a hird generation event driven programming language and integrated development environment (IDE) from Microsoft for its COM programming model first released in 1991. Visual Basic is designed to be relatively easy to learn and use. Visual Basic was derived from BASIC and enables the rapid application development (RAD) of graphical user interface (GUI) applications, access to databases using Data Access Objects, Remote Data Objects, or ArtiveX Data Objects, and creation of ActiveX controls and objects. The scripting language VBScript is a subset of Visual Basic.
CHAPTER 3
WEEK 10
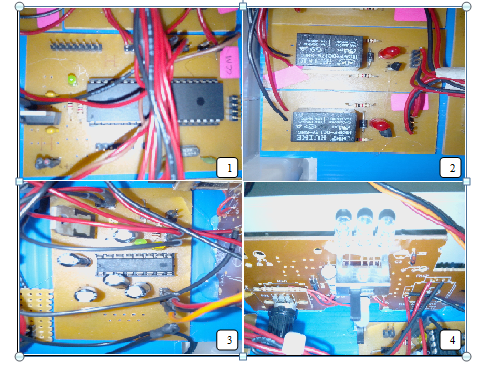
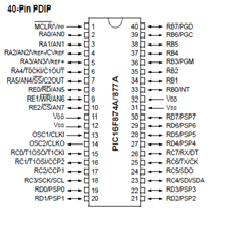
1. RC Helicopter

2. Circuit Development
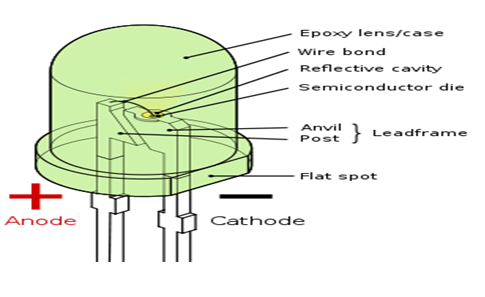
a) Relay
Step 1 – make sure all the component that want to use is completed
Step 2 – use the printed circuit which is circuit driver relay
Step 3 & Step 4 – insert the 1kΩ resistor to the selected hole
Step 5 – solder the resistor gently and make sure the soldering work is in the proper way.
Step 6, Step 7, Step 8 & Step 9 – insert the diode, transistor, relay and LED in the selected hole
Step 7 - solder the components nice and tidy.
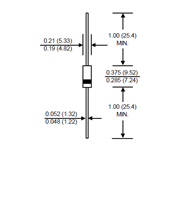
b) Microcontroller
1. RC Helicopter

a) Relay
Step 1 – make sure all the component that want to use is completed
Step 2 – use the printed circuit which is circuit driver relay
Step 3 & Step 4 – insert the 1kΩ resistor to the selected hole
Step 5 – solder the resistor gently and make sure the soldering work is in the proper way.
Step 6, Step 7, Step 8 & Step 9 – insert the diode, transistor, relay and LED in the selected hole
Step 7 - solder the components nice and tidy.
b) Microcontroller
Step 1 –
insert the IC base and resistor in the
selected hole
Step 2 –
insert the crystal and capacitor 18pF to the selected hole
Step 3
& Step 4 – insert the LED and capacitor
Step 5
& Step 6 – insert the voltage regulator and pin i/o in the selected hole
Step 7 – make sure all the steps above are finish by soldering the
component.
CHAPTER 3
WEEK 9
8. Capacitor
Capacitors are components that are used to store an electrical charge. For this project capacitor is use to protect microcontroller board of damage due to voltage drop too fast. Sometimes capacitors are used to smooth a current in a circuit as they can prevent false triggering of other components such as relays.
9. UIC00A
UIC00A is used to download the program in the form (.hex) into the PIC16F877A. UIC00A offers low cost yet reliable and user friendly PIC USB programmer solutions for developer, hobbyist and students. It is designed to program popular Flash PIC MCU which includes PIC12F, PIC16F and PIC18F family. It can also program 16bit PIC MCU. On board ICSPTM (In Circuit Serial Programming) connector offers flexible method to load program.
10. Printed Circuit Board Fabrication
1. To make a circuit board, at first we need to design the circuit. I'm using Proteus software because it is easy to use.
2. The transparent paper will be affixed to the PCB to make the process of UV rays.
3. By using special instruments for UV rays, paper and PCBs are already affixed neatly arranged above the emitted radiation.
4. Throughout this process runs, the PCB should be closed to prevent leakage of UV rays that can damage the circuit design.
5. PCB added to the liquid solution ferric Chloride (FeCl3) for etching process. FeCl3 powder mixed with warm water and mix depending on how fast the circuit to be completed. Silica layer PCB soaked up entirely detached and removed and washed with clean water.
6. After the PCB will be included in a special liquid developer. Developers will remove the silicon oxide (carbon) and the circuit design will be seen clearly. Then PCB rinsed with clean water.
11. MAX232


CHAPTER 3
WEEK 7
Flowchart

Electronic Part
1. PIC16F877A Microcontroller
2. Relay

3. Voltage Regulator

Flowchart
Electronic Part
1. PIC16F877A Microcontroller

2. Relay

3. Voltage Regulator


CHAPTER 2
WEEK 5
Previous Work
1. RC Helicopter Controlled by Arduino
In the previous work, RC helicopter conversion control method has been performed. But the method of doing this is to use the Arduino program. The use of Arduino circuit is easier because circuit can be included and used directly to replace the controller. RC helicopter is controlled using the Arduino can also operate as usual for the control system of the controller had been placed and replaced with the Arduino circuit. Data taken from the controller will be entered into the computer first and then the data is transferred through the program in the Arduino circuit. The next program that has been put into the Arduino circuit performance transferred to the joystick to control the RC helicopter. So all the data from the controller is replaced with the instructions in the joystick. Arduino circuit itself contains a transmitter for transmitted to a receiver on the RC helicopter.
2. RC Car Controlled by Computer
In the second previous work is RC car controlled by computer. This project to be converted the methods of control RC car using. This RC car modified at the controller. Instructions on the RC car is taken to make a new circuit and entered into a computer using a serial way. This project uses some software such as Visual Basic 6.0, MPLAB and Proteus. It is that there are arrows on the keyboard to move the RC car. It’s easier because it only has 4 directions of forward, backward, left and right.
Present Work
Review of History
Previous Work
1. RC Helicopter Controlled by Arduino
In the previous work, RC helicopter conversion control method has been performed. But the method of doing this is to use the Arduino program. The use of Arduino circuit is easier because circuit can be included and used directly to replace the controller. RC helicopter is controlled using the Arduino can also operate as usual for the control system of the controller had been placed and replaced with the Arduino circuit. Data taken from the controller will be entered into the computer first and then the data is transferred through the program in the Arduino circuit. The next program that has been put into the Arduino circuit performance transferred to the joystick to control the RC helicopter. So all the data from the controller is replaced with the instructions in the joystick. Arduino circuit itself contains a transmitter for transmitted to a receiver on the RC helicopter.
2. RC Car Controlled by Computer
In the second previous work is RC car controlled by computer. This project to be converted the methods of control RC car using. This RC car modified at the controller. Instructions on the RC car is taken to make a new circuit and entered into a computer using a serial way. This project uses some software such as Visual Basic 6.0, MPLAB and Proteus. It is that there are arrows on the keyboard to move the RC car. It’s easier because it only has 4 directions of forward, backward, left and right.
Present Work
RC helicopter project uses as a
tool to change the way of control. It no longer uses a common controller. This
project also uses some software such as Visual Basic 6.0, MPLAB and Proteus. Taken
command of the controller and serial converted to put and read on a computer. Instructions
on the computer can be determined by the program are included to control the RC
helicopter. For this project there are seven commands used for RC helicopter, A
flying up, D to fly down, I for forwards, M for Backward, L to right, J to the
left and K to stay.
Review of History
RC helicopter is now widely played
by people. But the method to control the RC helicopter is still the same, with
a normal controller. Through this project, the method of controlling RC
helicopter is increased by using a computer. So, it is not limited to only one
type of control.
CHAPTER 1
WEEK 3 & WEEK 4
Project Background
RC helicopter familiarity that we see in our surroundings is controlled only by remote control. We rarely get to see RC helicopter is controlled using other methods. Other method mentioned is like switching the remote control by using the computer as a remote control. Computer control method is somewhat different in terms of control RC helicopter. This case shows that there is improvement in the system's RC helicopter.
Project Statement
As a degree student of UniKL BMI learning electronics, I would like to use my capabilities in making this project a success in any possible means. By using all that I have learned and probably use my skills in troubleshooting, multitasking and inventing.
Objectives
Scope of Project
Project Background
RC helicopter familiarity that we see in our surroundings is controlled only by remote control. We rarely get to see RC helicopter is controlled using other methods. Other method mentioned is like switching the remote control by using the computer as a remote control. Computer control method is somewhat different in terms of control RC helicopter. This case shows that there is improvement in the system's RC helicopter.
Project Statement
As a degree student of UniKL BMI learning electronics, I would like to use my capabilities in making this project a success in any possible means. By using all that I have learned and probably use my skills in troubleshooting, multitasking and inventing.
Objectives
When a project is proposed, there must be reasons why the project
has been chosen out of many other projects. The Autonomous Surveillance
Helicopter by using Computer computer is a product that applies all the
knowledge that Electronics students gained throughout all the semesters
provided. Furthermore, this project has advantages that enhance its specialty.
The objectives to do this project are:
I.
To make the RC helicopter can fly in autonomous mode
II. To develop a system by using microcontroller.
Scope of Project
This project is one of that have been planned in the earlier of
this semester. Therefore, first of all have doing the research in book,
internet (IEEE XPOLRE), electronic magazine and other resources and discussion
between the experiences in programming and electronic fields how to complete
this project. Know the details about the component have been done by looking
the cost, type of component and search the component whether accessible in the
market or not. All data and information also collected by doing the research on
the internet and books.
To starting do the report by added several information that have
not include in proposal. Besides that, what kind of suitable program and
controller circuit or else that will be used in my project must be think and
research also. This report will remain the specification of the main project
planning of the system that needs to develop 5 by the requirement to the subject.
All the project planning is situated in this report will discuss base on the
development and time taking by the system to get the complete project.
This project is to convert the method in control RC helicopter. The
technology that we used in this project is using parallel communication to
control this robot because this communication faster and we using RC helicopter
to make it move. This robot is only used in home and small office because it
using the infrared to communicate the RC helicopter.
FYP Breifing
WEEK 2
This week have a briefing about the FYP 2. The lecture talked about the due date for presentation.
This week have a briefing about the FYP 2. The lecture talked about the due date for presentation.
Subscribe to:
Comments (Atom)